
Why choose Panoptica?
Four reasons you need the industry’s leading cloud-native security solution.

Attack-Path Analysis
Look at paths from diverse angles and get help with risk mitigation and resolution.

Cloud Native Application Security Solution
Reduce tools and vendors as you create secure, compliant cloud native apps.

Code & CI/CD Security
Get real-time vulnerability detection from development to runtime.

Data Security Posture Management (DSPM)
Classify and prioritize your data risks with greater precision aided by enhanced data discovery.

Smart Cloud Detection & Response (Smart CDR)
Real-time attack detection using AI/ML models trained for threat hunting.

Cloud Workload Protection (CWP)
Scale across environments and prioritize real-time risks for cloud workloads.

Cloud Security Posture Management (CSPM)
Scan, monitor, and remediate critical attack paths in your cloud stack instantly.

API Security
Inventory APIs, assess risk, and analyze specs with a single solution.

GenAI Solutions
Dive deeper into cloud risks with industry-leading context-aware GenAI for cloud native application security.
CIEM Solutions
Secure cloud identities by enforcing least-privilege access, reduce identity-based threats, and ensure compliance.

Integrations & Partners
Easily work from one platform with all the tools you already know and love using our integrations.
Get Started
Solutions
Attack-Path Analysis
Look at paths from diverse angles and get help with risk mitigation and resolution.
Cloud Native Application Security Solution
Reduce tools and vendors as you create secure, compliant cloud native apps.
Code & CI/CD Security
Get real-time vulnerability detection from development to runtime.
Data Security Posture Management (DSPM)
Classify and prioritize your data risks with greater precision aided by enhanced data discovery.
Smart Cloud Detection & Response (Smart CDR)
Real-time attack detection using AI/ML models trained for threat hunting.
Cloud Workload Protection (CWP)
Scale across environments and prioritize real-time risks for cloud workloads.
Cloud Security Posture Management (CSPM)
Scan, monitor, and remediate critical attack paths in your cloud stack instantly.
API Security
Inventory APIs, assess risk, and analyze specs with a single solution.
GenAI Solutions
Dive deeper into cloud risks with industry-leading context-aware GenAI for cloud native application security.
CIEM Solutions
Secure cloud identities by enforcing least-privilege access, reduce identity-based threats, and ensure compliance.
Integrations & Partners
Easily work from one platform with all the tools you already know and love using our integrations.


When it comes to protecting your AWS server estate, or your endpoints and servers in a broader perspective no matter the environment, one security tool solution that comes to mind is Endpoint Detection and Response (EDR). First suggested to Gartner in 2013, the EDR solution space has grown tremendously, with open-source tools like Wazuh and more mainstream offerings like Crowdstrike Falcon or Trend Micro, there is a lot of choice for security teams. EDR tools have changed quite a bit, even with newer acronyms like Extended Detection and Response (XDR) emerging, at the end of the day they are typically Agents (also called Sensors) which collect near real-time telemetry from your servers.
They can perform signature-based scans at times, use more complex behavioral and heuristic data to fingerprint malware variants, and can sometimes even collect metadata about services and software running on your server for the purpose of Vulnerability Management (at Panoptica we can do that without a sensor 😊). These capabilities provide added power across Prevention, Detection, and Response to ransomware (and other generic malware), trojans, keyloggers, and can help bolster your overall detection strategy.
Here at the Panoptica Office of the CISO we strive to use the least amount of fully capable tools as possible to do the job and focus on feature sets and compatibility across environments. Not only do we support a multinational company spread across various endpoint devices we also make heavy usage of AWS, Azure, and GCP for the purpose of hosting the Panoptica platform and to support our security research.
For our purpose, we chose to stick with Microsoft Defender for Endpoint (MDE), which was formerly known as Microsoft Defender Advanced Threat Protection (MDATP). We have this as part of our Microsoft E5 license which provides many other strong enterprise features such as Data Loss Prevention (DLP) and Cloud Access Security Brokerage (CASB). MDE can certainly fall more into the XDR category than anything else, as it provides EDR capabilities, Indicator of Compromise (IOC), and threat intelligence integrations, can perform software asset management, vulnerability scanning, configuration management, and on-demand anti-virus scanning.
All of these capabilities come backed with strong APIs that we use for custom reporting, further enrichment, and providing findings and alerts into our Security Information Event Management (SIEM) tooling.
At the Panoptica Office of the CISO using MDE across every compute instance and endpoint provides us a clean and consistent way to perform many required security duties across the team. We have a single place for all threat detections and preventions, with the Microsoft Defender 365 console providing the ability to correlate timelines, perform on-host interventions with a secure shell, and forward alerts and incidents to our SIEM. We also have a single place to go for hardening recommendations, software inventory, patch automation (with integration into Microsoft Endpoint Manager), and vulnerability management. We can feed into high-danger Indicators of Compromise (IOCs) to outright prevent connectivity to known-malicious sites and can also schedule and execute ad-hoc virus scans on hosts and connected file systems. While the feature set is not fully-baked across all Operation Systems, most maturity is with Windows (obviously), MDE also integrates with Microsoft Cloud Access Security (MCAS) a CASB platform that we use for sanctioned service monitoring and in-line DLP, and on-host DLP is also provided to ensure sensitive information is not mishandled or maliciously disclosed.
As far as the AWS server estate goes, we make use of EC2 for Elastic Kubernetes Service (EKS) Nodes and Elastic Container Service (ECS) for container orchestration as part of our platform. We use EC2 instances to host other tooling, including purposely vulnerable hosts for our security research team and the wider Office of the CISO. So, using MDE provides us excellent protection for container and Kubernetes hosts should a potential adversary escape a cluster or container, and we can also continuously test the efficacy of MDE against our own tradecraft.
There are drawbacks, however. Where some EDR offerings can connect into the Instance Metadata Service (IMDS) of EC2 (regardless of if its standalone or used for ECS/EKS) to provide AWS-specific context, MDE cannot do that. This makes us rely on the ability to add Tags to Devices managed by MDE and use further automation with AWS and Microsoft APIs to create reports tracking Key Performance Indicators (KPIs) such as EDR coverage. We will explore that in a later entry in these series, for this first entry, we will focus on how to setup MDE on Linux instances on AWS as well as creating an Azure Application to perform authentication into the Defender APIs and provide reference code for the same.
Before beginning, you should either have a Microsoft Enterprise E5 License or are part of a Microsoft Defender for Endpoint Trial. You will also need Global Administrator roles for your Active Directory User as well as access to an AWS Account with permissions to work Systems Manager Parameter Store and Amazon S3 for the purpose of creating parameters and uploading objects. Finally, you should already have an Amazon EC2 instance running Ubuntu created for the next section.
This blog also assumes you have basic understanding of navigating the AWS console, installing and configuring the AWS CLI, as well as the ability to perform tasks such as adding Instance Profiles to Amazon EC2 instances and gaining access using Putty, SSH or AWS Systems Manager Session Manager.
In this section, we will walk through installing MDE on your Amazon EC2 instances running Ubuntu 20.04 LTS. You can reproduce these steps on any Ubuntu server regardless of if it is on AWS or otherwise, if you use another operating system such as Amazon Linux 2 or SUSE ensure you replace relevant commands or use the Microsoft documentation for installation for a walk through.
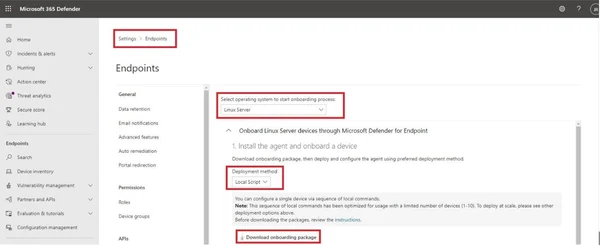
Figure 1 - MDE Onboarding Script
aws s3 cp ./WindowsDefenderATPOnboardingPackage.zip s3://${YOUR_BUCKET_HERE}/mdatp/WindowsDefenderATPOnboardingPackage.zipNote: The old name of MDE, MDATP, is shown as the package names but it is the same binary
sudo apt update
sudo apt upgrade -y
sudo apt install -y curl python3-pip libplist-utils gpg apt-transport-https zip unzip
curl -o microsoft.list https://packages.microsoft.com/config/ubuntu/20.04/prod.list
sudo mv ./microsoft.list /etc/apt/sources.list.d/microsoft-prod.list
curl https://packages.microsoft.com/keys/microsoft.asc | sudo apt-key add -
sudo apt update
sudo apt install -y mdatp
pip3 install --upgrade awscli
pip3 install --upgrade boto3aws s3 cp s3://${YOUR_BUCKET_HERE}/mdatp/WindowsDefenderATPOnboardingPackage.zip .
unzip WindowsDefenderATPOnboardingPackage.zip
python3 MicrosoftDefenderATPOnboardingLinuxServer.py
mdatp threat policy set --type potentially_unwanted_application --action auditNote: For more information on configurations for MDE on Linux use the command “mdatp help” and/or view the following Documentation from Microsoft, Set preferences for Microsoft Defender for Endpoint on Linux
Important Note: This can take up to 24 hours to reflect in the MDE Console. Additionally, this will not work if IMDSv2-only options are set on your instance.
INSTANCE_ID=$(curl http://169.254.169.254/latest/meta-data/instance-id)
mdatp edr tag set --name GROUP --value $INSTANCE_ID
Figure 2 - Ubuntu AWS Servers in Device inventory
Despite what is shown in Fig. 2, you likely will not have any information populate right away for Exposure Level and Risk Level. These data points present aggregated scoring and severity leveling for the number of misconfigurations and vulnerabilities on your device and information on past alerts and incidents, respectively.
Your Domain for the devices may also differ. These two instances shown in the screenshot were onboarded with the “us-east-2” Region of AWS and did not have a Public IP assigned. If you have multiple Linux instances across your estate, you can filter on the Domain within the console and any API automation you create to ensure your AWS servers are chosen. After a few hours, the Tag value will also populate within the individual Device page (Fig. 3) which can also be filtered on individually. Unfortunately, MDE does not allow you to specify more than one Tag from the CLI at this time, otherwise it would make more sense to replicate across your EC2 Instance tags along with other metadata such as the AWS Region, an AWS Server tag, and other pertinent information. You can do this manually in the console or by using the Update Machine API to programmatically set tags.
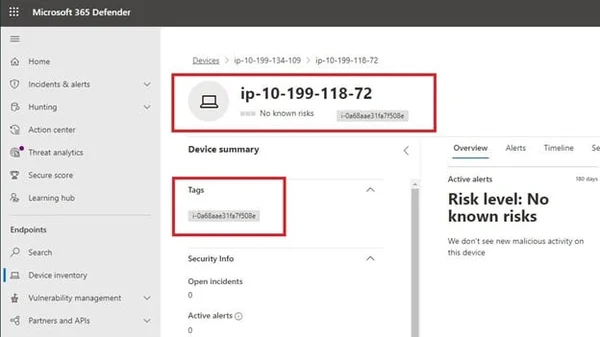
Figure 3 - Tagged AWS instance in MDE
At this stage, you have successfully installed MDE on your first Ubuntu Amazon EC2 instance and learned how to properly configure it and use the CLI. During the next stage, we will create an Azure Application to be able to programmatically authenticate and interact with the Microsoft Defender APIs.
In this section we will create and register an Azure Application which will provide credentials we can exchange for OAuth2 tokens that are used to provide authorization to use MDE APIs. We will build the Application in the console, assign, and consent to Permissions, and provide several Python code snippets for basic interaction with the APIs.
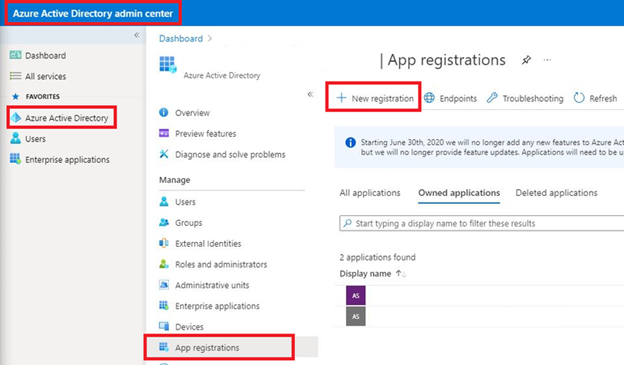
Figure 4 - New App Registration
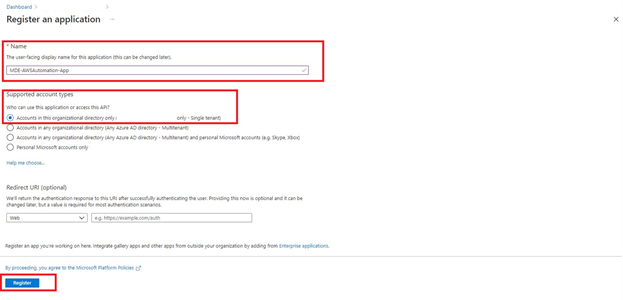
Figure 5 - App Registration Naming
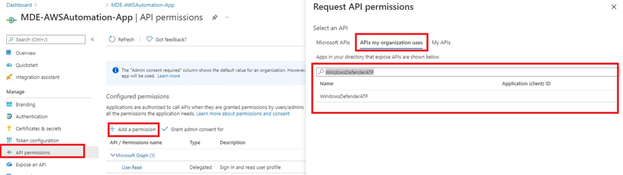
Figure 6 - Searching for App API Permissions
All these permissions will be used at some point by different solutions to process different metadata sent by MDE - whether it is IP Address history of an Endpoint / Server, or to run an ad-hoc anti-virus scan. While this may seem like a lot of mixed permissions (heavy Read, some Write) - other Azure Applications will be created for heavier “Write” workloads in future blogs (along with these permissions). If desired, you can only use “Machine.Read.All” and “Machine.ReadWrite.All” for this specific blog post.
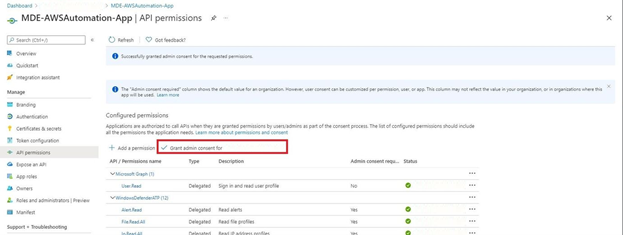
Figure 7 - Admin Consent
aws ssm put-parameter \
--name MDE-AWSAutomation-App-ClientID \
--description 'Application (client) ID for the MDE-AWSAutomation-App Azure Application' \
--type SecureString \
--value $PLACEHOLDER

aws ssm put-parameter \
--name MDE-AWSAutomation-App-DirectoryID \
--description 'Directory (tenant) ID for the MDE-AWSAutomation-App Azure Application' \
--type SecureString \
--value $PLACEHOLDER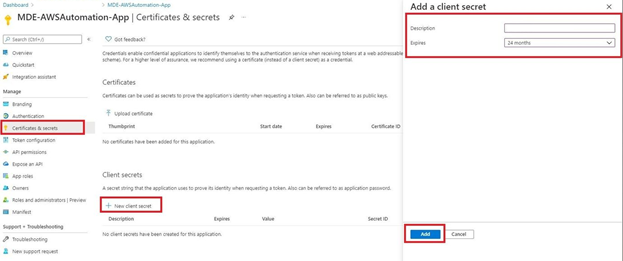
Figure 8 - Create App Client Secret
aws ssm put-parameter \
--name MDE-AWSAutomation-App-SecretID \
--description 'Secret ID for the MDE-AWSAutomation-App Azure Application' \
--type SecureString \
--value $PLACEHOLDER
Now that you have successfully registered an Azure Application and vaulted the pertinent secrets in encrypted AWS Systems Manager Parameters, you will be able to experiment with authentication to the API and interaction. You can choose to use the Ubuntu instance that you installed the MDE agent on in the earlier steps the execute the following Python scripts.
As far as Authentication and Authorization works when using an Azure Application, you provide your Tenant ID, Client ID, and Client Secret ID to the “oauth2/token” API and receive a limited-time usage JSON Web Token (JWT) in return that you insert into an Authorization Header in your HTTP requests to the various REST APIs. You will be Authorized to perform actions within the Permissions scopes you provided and consented to in Steps 5 and 6. For the exact Permissions, you will need refer to the Permissions section of the API documentation as shown below (Fig. 9), or use this link.
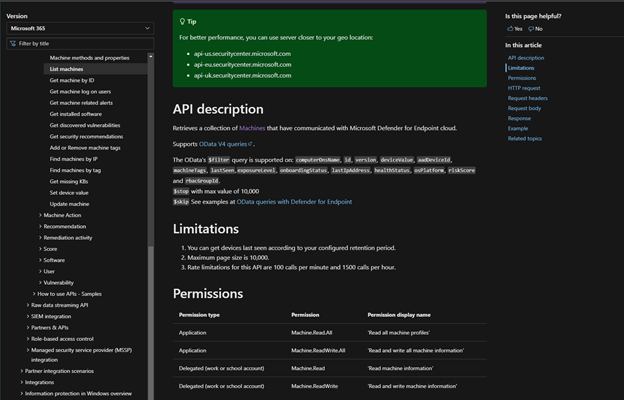
Figure 9 - Microsoft API Permissions Documentation
As far as high-level code you can reuse in your Python scripts and applications, consider the snipped below. You will use the Python “requests” library to create a Python function that you can call throughout your script that will return a new JWT for Authorization every time it is called. The script will retrieve and decrypt the values for the Application you vaulted in Parameter Stored, provide them in the first request, and vend the token. Regardless of where you run this script from you will need “ssm:GetParameter” AWS IAM Permissions or it will fail.
Note: “export” commands are provided in the commented section of the script to quickly set the Parameter names we created in Steps 7 and 9 in your environment variables. You may also need to install the Requests library with “pip3 install --upgrade requests”.
import boto3
import os
import requests
import json

ssm = boto3.client('ssm')

# Env Vars
tenantIdParam = os.environ['AZURE_APP_TENANT_ID_PARAM']
clientIdParam = os.environ['AZURE_APP_CLIENT_ID_PARAM']
secretIdParam = os.environ['AZURE_APP_SECRET_ID_PARAM']

'''
export AZURE_APP_TENANT_ID_PARAM=MDE-AWSAutomation-App-DirectoryID
export AZURE_APP_CLIENT_ID_PARAM=MDE-AWSAutomation-App-ClientID
export AZURE_APP_SECRET_ID_PARAM=MDE-AWSAutomation-App-SecretID
'''

def get_token():
tenantId = ssm.get_parameter(Name=tenantIdParam,WithDecryption=True)['Parameter']['Value']
clientId = ssm.get_parameter(Name=clientIdParam,WithDecryption=True)['Parameter']['Value']
secretId = ssm.get_parameter(Name=secretIdParam,WithDecryption=True)['Parameter']['Value']

tokenUrl = f'https://login.microsoftonline.com/{tenantId}/oauth2/token'
resourceAppIdUri = 'https://api.securitycenter.microsoft.com'

#tokenHeaders = { 'Content-Type': 'application/x-www-form-urlencoded' }

tokenData = {
'client_id': clientId,
'grant_type': 'client_credentials',
'resource' : resourceAppIdUri,
'client_secret': secretId
}

r = requests.post(tokenUrl, data=tokenData)

token = r.json()['access_token']

return token
This script is useful if you understand how to use it within a Python script, but let’s work on a more direct example. The following script will build upon the snippet above and parse the values from the List Machines API which will provide information on all Devices that are registered with MDE. This is an important API to familiarize yourself with as it contains metadata (Machine IDs) that are needed for other APIs such as running scans, gathering software inventory, or collecting vulnerability data (CVEs).
import boto3
import os
import requests
import json
import pandas as pd

ssm = boto3.client('ssm')

# Env Vars
tenantIdParam = os.environ['AZURE_APP_TENANT_ID_PARAM']
clientIdParam = os.environ['AZURE_APP_CLIENT_ID_PARAM']
secretIdParam = os.environ['AZURE_APP_SECRET_ID_PARAM']

'''
export AZURE_APP_TENANT_ID_PARAM=MDE-AWSAutomation-App-DirectoryID
export AZURE_APP_CLIENT_ID_PARAM=MDE-AWSAutomation-App-ClientID
export AZURE_APP_SECRET_ID_PARAM=MDE-AWSAutomation-App-SecretID
'''

def get_token():
tenantId = ssm.get_parameter(Name=tenantIdParam,WithDecryption=True)['Parameter']['Value']
clientId = ssm.get_parameter(Name=clientIdParam,WithDecryption=True)['Parameter']['Value']
secretId = ssm.get_parameter(Name=secretIdParam,WithDecryption=True)['Parameter']['Value']

tokenUrl = f'https://login.microsoftonline.com/{tenantId}/oauth2/token'
resourceAppIdUri = 'https://api.securitycenter.microsoft.com'

#tokenHeaders = { 'Content-Type': 'application/x-www-form-urlencoded' }

tokenData = {
'grant_type': 'client_credentials',
'client_id': clientId,
'resource' : resourceAppIdUri,
'client_secret': secretId
}

r = requests.post(tokenUrl, data=tokenData)

token = r.json()['access_token']

print('SSM Parameters processed and OAuth Token created')

return token

def get_machines():
token = get_token()

headers = {'Authorization': f'Bearer {token}'}

r = requests.get('https://api-us.securitycenter.microsoft.com/api/machines', headers=headers)

machineIds = []

for v in r.json()['value']:

machineIds.append(v)

with open('./processed_machines.json', 'w') as jsonfile:
json.dump(machineIds, jsonfile, indent=4, default=str)

print('All registered machines in MDE Retrieved')

return machineIds

get_machines()
To use this script, create a file named “ListMachines.py” and execute with “python3 ListMachines.py”, this script will retrieve a JWT and use it to authenticate to the Machines API within Microsoft 365 Defender. The response is parsed and looped through and written to a List and finally writes to a JSON document once the loop is finished. The JSON file can be further used in other scripts, for Business Intelligence tools (such as Amazon QuickSight) or indexed within a Configuration Management Database (CMDB) or a SIEM tool.
The type of information provided back includes the Machine unique ID, onboarding, and health status of the resource, as well as different machine-specific data such as if the machine is managed by Intune or is joined to an Active Directory Domain. You can also retrieve rolled up information such as the Risk Level and Exposure Level, tags, and IP addresses identified by the MDE Agent on the host. An example of the output for an EC2 Instance is shown below. One thing to note is that information in the API is rendered differently than in the Console. Whereas every Linux operating system is simply indexed as Linux for the Platform type in the console, the API returns the specific operating system platform such as Ubuntu.
{
"id":"8fdf26EXAMPLEXAMPLE",
"computerDnsName":"ip-10-199-000-109.us-east-2.compute.internal",
"firstSeen":"2021-10-25T17:15:11.5179399Z",
"lastSeen":"2021-10-27T13:20:42.9040122Z",
"osPlatform":"Ubuntu",
"osVersion":null,
"osProcessor":"x64",
"version":"18.4",
"lastIpAddress":"10.199.000.109",
"lastExternalIpAddress":"3.000.158.000",
"agentVersion":"30.121082.14513.0",
"osBuild":null,
"healthStatus":"Active",
"deviceValue":"Normal",
"rbacGroupId":0,
"rbacGroupName":null,
"riskScore":"None",
"exposureLevel":"Medium",
"isAadJoined":false,
"aadDeviceId":null,
"machineTags":[
"i-06e8037EXAMPLE"
],
"defenderAvStatus":"NotSupported",
"onboardingStatus":"Onboarded",
"osArchitecture":"64-bit",
"managedBy":"Unknown",
"ipAddresses":[
{
"ipAddress":"10.199.000.109",
"macAddress":"061856674AFC",
"type":"Other",
"operationalStatus":"Up"
},
{
"ipAddress":"fe80::418:56ff:fe67:4afc",
"macAddress":"061856674AFC",
"type":"Other",
"operationalStatus":"Up"
},
{
"ipAddress":"127.0.0.1",
"macAddress":"000000000000",
"type":"Other",
"operationalStatus":"Up"
},
{
"ipAddress":"::1",
"macAddress":"000000000000",
"type":"Other",
"operationalStatus":"Up"
}
],
"vmMetadata":null
}In this blog we covered the topic of EDR/XDR and the various use cases across threat detection and prevention and well as incident response that it can fill. We explored why the Panoptica Office of the CISO decided to use Microsoft Defender for Endpoint to fulfill our EDR needs across all platforms and environments instead of other EDR solutions on the market and introduced ways to get over the non-cloud awareness. We went over how to manually install and onboard an Ubuntu instance on the AWS Cloud to Microsoft Defender for Endpoint and how to create Azure Applications with permissions to interact with Microsoft 365 Defender APIs. Finally, we created a basic Python script for authentication to the Defender APIs and to retrieve all registered devices.
In future entries in this series, we will cover automation and reporting use cases including creating a unified vulnerability management dashboard and automating its creation and updates over time. We will also explore building pre-hardened images and using near real-time automation to update and install the MDE agents.
Stay tuned as we will cover other topics within cloud security and DevSecOps outside of MDE as well!
Stay Dangerous.


